[TIPS] Fileds Operation Differences between Form Fields and BPF Fields

 When a form displays a business process flow control in the header, additional controls gets added for each attribute that is been displayed in that BPF. 

These controls hold unique names like: header_process_<attribute name>

Code compare Tool: Beyond Compare with License Key


Beyond Compare

V 4.2.2


--- BEGIN LICENSE KEY ---
H1bJTd2SauPv5Garuaq0Ig43uqq5NJOEw94wxdZTpU-pFB9GmyPk677gJ
vC1Ro6sbAvKR4pVwtxdCfuoZDb6hJ5bVQKqlfihJfSYZt-xVrVU27+0Ja
hFbqTmYskatMTgPyjvv99CF2Te8ec+Ys2SPxyZAF0YwOCNOWmsyqN5y9t
q2Kw2pjoiDs5gIH-uw5U49JzOB6otS7kThBJE-H9A76u4uUvR8DKb+VcB
rWu5qSJGEnbsXNfJdq5L2D8QgRdV-sXHp2A-7j1X2n4WIISvU1V9koIyS
NisHFBTcWJS0sC5BTFwrtfLEE9lEwz2bxHQpWJiu12ZeKpi+7oUSqebX+
--- END LICENSE KEY -----


The above license key only applies to version 4.2.2.


Click for download.

How to filter Option Set Field options based on form

 How to filter Option Set Field options based on form


In some scenarios, we may need to filter the option set types of fields' options based on some conditions.

Capture user's signature in Dynamics 365 CE

 Sometimes we may need to capture user's signature in Dynamics 365.

How to exceed 50 characters maximum label length limitation to set a long label for the Dynamics 365 CE fields.

How to exceed 50 characters maximum label length limitation to set a long label for the Dynamics 365 CE fields. 


 As we know there is a 50 characters maximum length limitation for the fields(columns) labels of entities(tables) in Dynamics 365 CE.

Sometimes, we may need a longer label than 50 characters. How to do that?

Newly introduced client script methods for D365 CE

 https://nebulaaitsolutions.com/newly-introduced-client-script-methods-for-d365-ce/


Newly introduced client script methods for D365 CE

This blog will talk about the new client script methods that can enhance UI/UX experience.

addOption

This method adds an option to your choice/choices control.

formContext.getControl(arg).addOption(option, index);

Example

removeOption 

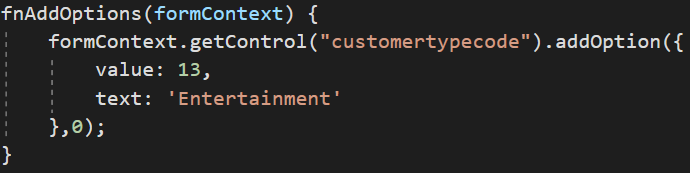
Removes an option from a choice/choices control.

formContext.getControl(arg).removeOption(value);

Example

clearOptions 

Clears all options from a choice/choices control.

formContext.getControl(arg).clearOptions();

Example

setFocus 

Sets the focus on the control.

formContext.getControl(arg).setFocus();

Example

setLabel

Sets the label of the control.

formContext.getControl(arg).setLabel(label);

Example

addOnLookupTagClick 

Adds an event handler to the OnLookupTagClick event.

OnLookupTagClick:- This event occurs when the user clicks the tag in a lookup control.

formContext.getControl(arg).addOnLookupTagClick(myFunction);

createPane 

Provides all the information to create side panes.

Xrm.App.sidePanes.createPane(paneOptions);

Click here to learn more about paneOptions

Example for addOnLookupTagClick & createPane 

Creating HTML Web Resource To Show Image Attached In Notes Using Web API

 https://www.c-sharpcorner.com/article/creating-html-web-resource-to-show-image-attached-in-notes-using-web-api/


Some time back, I wrote a post for retrieving an image attached to notes using OData, as now for Dynamics 365 CE, we use Web API. So, I am going to share how we can do it using Web API.

Microsoft Dynamics CRM stores all the notes and attachments in annotation entities. Most out of the box entities used to have a relationship with this entity, but while creating our custom entity we can specifically select if we want to associate our custom entity with notes or not use the following option under Communication & Collaboration. Keep in mind once you enable this option, there is no way to disable this option, but if you are not sure, if you need notes or not at the time of your entity creation it's better to leave this option un-selected, so that you can select this option after sometime if required.

Note
The default size for notes attachment is 5 MB but if required, you can increase this limit to up to 32 MB.

We are going to implement following two steps,
  • Get entity image from notes
  • Create and deploy html web resource

Get entity image from notes

Similar to earlier versions we can upload the image to notes in Dynamics 365 CE.

Once image is attached to notes, we can retrieve it using Web API retrievemultiple request where we can query notes based on ObjectId field, we need to pass entity id field for objectid field in notes. We can using following code, in our html webresource,

  1. <html><head>  
  2. <script type="text/javascript">  
  3. //check if document is loaded or not  
  4. var imgControl = document.createElement("IMG");  
  5. //Check if documented loaded fully  
  6. document.onreadystatechange = function () {  
  7.    if (document.readyState == "complete") {  
  8.       getnotesImages();  
  9.    }  
  10. }  
  11.    
  12. //this function is used to get image from notes  
  13. function getnotesImages()  
  14. {  
  15.  //get regarding object id  
  16.    var regardingObjectId=window.parent.Xrm.Page.data.entity.getId().substring(1, 37);  
  17.    
  18.    //prepare URL  
  19.    var webapiURL=window.parent.Xrm.Page.context.getClientUrl() + "/api/data/v8.2/annotations";   
  20.    
  21.    //prepare query  
  22.    var webapiQuery ="?$select=annotationid,documentbody,mimetype&$filter=_objectid_value eq "+regardingObjectId+" and  isdocument eq true and startswith(mimetype, 'image/')";  
  23.    
  24. //call image  
  25. var req = new XMLHttpRequest();  
  26. req.open("GET", webapiURL+webapiQuery, true);  
  27. req.setRequestHeader("OData-MaxVersion", "4.0");  
  28. req.setRequestHeader("OData-Version", "4.0");  
  29. req.setRequestHeader("Accept", "application/json");  
  30. req.setRequestHeader("Content-Type", "application/json; charset=utf-8");  
  31. req.setRequestHeader("Prefer", "odata.include-annotations=\"*\",odata.maxpagesize=1");  
  32. req.onreadystatechange = function() {  
  33.     if (this.readyState === 4) {  
  34.         req.onreadystatechange = null;  
  35.         if (this.status === 200) {  
  36.             var results = JSON.parse(this.response);  
  37.            if(results.value.length>0) {  
  38.                 var annotationid = results.value[0]["annotationid"];  
  39.                 var documentbody = results.value[0]["documentbody"];  
  40.                 var mimetype = results.value[0]["mimetype"];  
  41.                 //set image  
  42.                 imgControl.src="data:" + mimetype + ";base64," + documentbody;  
  43.                 document.getElementById('imagediv').appendChild(imgControl);  
  44.             }  
  45.         } else {  
  46.             Xrm.Utility.alertDialog('Error while retrieving image details');  
  47.         }  
  48.     }  
  49. };  
  50. req.send();  
  51. }  
  52. </script>  
  53. <head><body style="zoom: 1; word-wrap: break-word;">  
  54.    
  55. <div style="width: 100px;" id="imagediv"></div>  
  56.    
  57. </body></html>  

Create and deploy html web resource

Now, we need to create an HTML web resource and use the above code under Text Editor.

After that, we can put this web resource to our required Entity Form and we should be able to see the first attached image in web resource after refreshing the page.

Next we will explain how to create a HTML web resource and use our JavaScript method to get and display the image. We need to implement the following two steps:

             · Create HTML page

             · Deploy HTML page and SDK.REST.js using web resource

Create HTML page

Create a HTML page using a HTML editor. Use the following code for the HTML page: 

  1. <html lang="en-us"><head>  
  2.  //Reference clientglobalcontest.js to get context information
  3.  <script src="../ClientGlobalContext.js.aspx"></script>
  4.  //add SDK.Rest.js reference
  5.  <script type="text/javascript" src="SDK.REST.js"></script>  
  6.  <script type="text/javascript">  
  7.   //check if document is loaded or not  
  8.    var imgControl = document.createElement("IMG");  
  9.    //Check if documented loaded fully  
  10.    document.onreadystatechange = function () {  
  11.    if (document.readyState == "complete") {  
  12.         getnotesImages();  
  13.    }  
  14.   }  
  15. //this function is used to get image from notes  
  16. function getnotesImages()  
  17. {  //get regarding object id  
  18.    var regardingObjectId=window.parent.Xrm.Page.data.entity.getId();  
  19.    //assign notes entity name  
  20.    var entitySchemaName="Annotation";  
  21.    var odataQuery = "?$top=1&$select=AnnotationId,DocumentBody,MimeType&" +  
  22.                     "$filter=ObjectId/Id eq guid'" + regardingObjectId +  
  23.                     "' and IsDocument eq true and startswith(MimeType,'image/') ";  
  24.    //call retrieveMultipleRecords method in SDK.REST javascript script library  
  25.    SDK.REST.retrieveMultipleRecords(entitySchemaName, odataQuery, getnotesImagesCallback, function (error) { alert(error.message); }, function(){});  
  26. }  
  27. //process callbanck result  
  28.  function getnotesImagesCallback(resultSet)  
  29.     {  
  30.         if (resultSet.length > 0) {  
  31.             var mimeType = resultSet[0].MimeType;  
  32.             var body = resultSet[0].DocumentBody;  
  33.             imgControl.src="data:" + mimeType + ";base64," + body;    
  34.             document.getElementById('imagediv').appendChild(imgControl);  
  35.             }  
  36.     }  
  37.  </script>  
  38. <meta charset="utf-8"></head><body style="zoom: 1;">  
  39. <div style="width: 100px;" id="imagediv"></div>   
  40. </body></html>  

Deploy HTML page and SDK.REST library using web resource

Use following procedure to deploy a HTML page and SDK.REST library in Microsoft CRM.

  •       Navigate to Settings -> Customization-> Customize the System from the top navigation bar
  •       Navigate to Components -> Web Resources-> New
  •       Fill in the details as in the following screen: 

  •        Click on the browse button and select your HTML web resource.
  •        Click on Save and then Publish
  •        Navigate to Components -> Web Resources-> New
  •        Fill in the details as in the following screen:


  •       Click on browse and select SDK.REST.js from Microsoft CRM SDK

Note: Please refer to my previous article for the SDK.REST.js location.

Now we can place our HTML web resource in the account entity form by navigating to Insert  -> Web Resource options. Save your changes and then publish the account entity form.
 
When you try to open your account record you should be able to see the attached images loaded into the HTML web resource.