Show or hide the 'Add New' button on form sub-grid based on the value on the form

 https://ribbonworkbench.uservoice.com/knowledgebase/articles/489288-show-or-hide-the-add-new-button-on-form-sub-grid


How do I show or hide the 'Add New' button on form sub-grid based on the value on the form. 

You cannot use the ValueRule because the context of this rule must be run from a form Command Bar - so we must use a custom JavaScript rule.

Solution:

1. Create a JavaScript webresource that contains the function:

function ClientHooks_Ribbon_OpportunityRibbon_SubGridEnableRule() {
    var attribute = Xrm.Page.getAttribute('<your attribute logical name here>');
    return attribute.getValue() != null; // Return true to enable the button }

This function will be used to enable the sub-grid add button when there is a value in the attribute you reference.


2. Add the child entity that you want to change the sub-grid behaviour for to a solution. Also add the webresource with the javascript function above and then load the solution into the Ribbon Workbench.

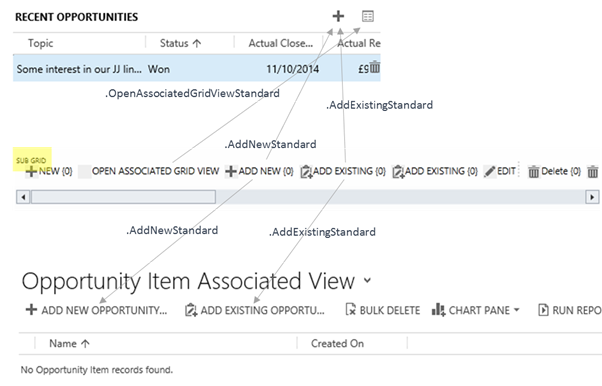
2. Select the child entity from the Entities panel and identify which button you need to customise:]


3. Right-Click on the button and click Customize Command

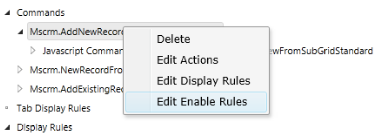
4. The new command will show in the Solution Elements Panel and additionally all the referenced EnableRules and DisplayRules will also be added. Since we don’t need to customise these, we can select each one in turn and set IsCore=True in the properties panel.

5. Now to add the new ValueRule. Right click on the new customised command and click Edit Enable Rules.


6. Click Add New and then Add Step. Select Custom Javascript Rule and set the properties:

·         FunctionName = ClientHooks_Ribbon_OpportunityRibbon_SubGridEnableRule

·         Library = <Select the library you added above>

7. Click Publish

Refreshing the subgrid command bar

You will find that when the form is loaded, if there is a value in the attribute you have referenced in your enable rule, the Add New button will be visible. If however the value changes, the sub-grid command bar will not automatically refresh to reflect the new state. Upon adding or deleting rows in the sub-grid the command bar is refresh – but this isn’t much use in this case.

The main form command bar can be refreshed using Xrm.Page.ui.refreshRibbon() however this will not refresh sub-grid command bars. Instead, we can add an onchange event to the fields that are used in our VaueRule and call:

Xrm.Page.data.save();

This will refresh the sub-grids and re-evaluate any of the EnableRules however it will also save any other dirty attributes and so should be used with caution if you do not have auto-save enabled.

[Demo - Step by step] Power Pages & SharePoint File Upload


Just show the different parts from the previous demo which was finished by using Power Apps Portal.


[Demo step by step] Power Apps Portal & SharePoint File Upload


Demo step by step: 
Power Apps Portal with several steps of process flow by using Advanced Form (Web Form)
Support SharePoint Documents upload.


Power Apps Portal issue: "Server Error in '/' Application


Power Apps Portal "Server Error in '/' Application

"a connection attempt failed because the connected party did not properly respond after a period of time, or established connection failed because connected host has failed to respond"


The below solution could be a reference for you.

1. Go to portal app setting:


2. Go admin page:


3. Try "Update Dynamics 365 URL" firstly, if still doesn't work. 
    Then try  "Restart Portal". After several minutes, the portal may recover.


Hide "New folder" button of SharePoint in Power Apps Portal

When integrated SharePoint to Portal, there will be two buttons for document management: "Add files" and "New folder".


If you don't hope the user to be able to create new folders, you may follow below steps to hide "New folder" button.

1. Find the specific Entity form your Share Point document upload grid located at within your Portal Management.

2. Switch to "Additional settings" tab.

3. Go to the "Custom JavaScript" section part, then type the following JavaScript code:


$(document).ready(function(){
    $('a.add-folder.btn.btn-info.action').hide()
})

4.JPG


4. Go to your Portal Designer, click "Sync Configuration"-> "Browse website" button, then launch your Entity form again, the "New Folder" button would disappear:

5.JPG

Power Apps Portal : How to add Advanced Form / Web Form into webpage

 Power Apps Portal :  How to add Advanced Form / Web Form into webpage


Precondition: An advanced form(web form) and a basic form (entity form) have been created.

Step 1:  Add a basic form (entity form) into a section of the webpage.

Step 2: Update the script:

             Change "entityform" to "webform"

             Change the form name to the advanced form's name

Step 3: Browse website


Power Apps Portal - Entity Form / Basic Form Doesn't show in the published webpage


Issue: Power Apps Portal - Entity Form / Basic Form Doesn't show in the published webpage

Reason: Form doesn't support the current webpage template.

Solution: Change the webpage template.


Installing and Configuring the Free COVID Vaccine Tracker Test Uploader for Power Apps Portals


Package for download

https://github.com/Pragmatic-Works/Vaccine-Tracker-Power-App


Conditionally Show/Hide fields on Power Apps Portal by Using JavaScript


$(document).ready(function () {

$("#prag_manufacturer").change(onDisplaySectionChange); onDisplaySectionChange(); }); function onDisplaySectionChange() { var varManuf = $('#prag_manufacturer').find("option:selected").text(); if (varManuf === "Other") { $('#prag_othermanufacturer').parent().parent().show(); } else { $('#prag_othermanufacturer').parent().parent().hide(); } }


Mobile Offline Capability for Model-Driven Apps

 https://knowledgefrommanish.com/powerapps/power-apps-mobile-app-mobile-offline-capability-for-model-driven-apps/

Create A Portal Inbox & Messaging Process (Dynamics 365 Power Platform Portal)

 https://meganvwalker.com/create-a-portal-inbox-messaging-process/

GLOBAL WORKFLOW

 http://alexmscrm.blogspot.com/2017/10/dynamics-365-workflow-within-business.html

Developer citizen

 Citizen Dev. Journey - Setting up your Microsoft Power Apps Test Environment

https://www.linkedin.com/pulse/citizen-dev-journey-setting-up-your-microsoft-power-joe-camp/

Install SQL Server Integration Services in Visual Studio 2019

 https://www.mssqltips.com/sqlservertip/6481/install-sql-server-integration-services-in-visual-studio-2019/

Repeater section content control in Word Template

Using Power Automate word templates with Model-Driven apps

 https://www.itaintboring.com/dynamics-crm/using-power-automate-word-templates-with-model-driven-apps/

Workflow activity Samples

 https://rajeevpentyala.com/2019/03/23/code-snippet-custom-workflow-activity-with-input-and-output-params/


https://docs.microsoft.com/en-us/power-apps/developer/data-platform/workflow/tutorial-create-workflow-extension


https://github.com/microsoft/PowerApps-Samples/blob/master/cds/orgsvc/C%23/WorkflowActivities/WorkflowActivities/RetrieveCreditScore.cs


Use two-option type of field in Business Process Flow to force user choose specified value to advance to next stage

 Requirement:

Force users to choose the specified value of a field in certain stage of Business Process Flow to be able to advance to next stage.

Solution:

1. Set the filed type to "Two Options", and don't set the value which you hope users to choose as the default value.

2. Click the “required” box of the filed on the process flow step, rather than set the requirement on the field definition in customization.


[ISSUE] Dynamics 365 - Advanced Find: One column doesn't show value, but shows in exported excel report

Issue:

   Dynamics 365 - Advanced Find:  One column doesn't show value, but shows in exported excel report.

   For example, below is an Invoice list, the red circled column below "Acutual Revenue(Base) (Opportunity)"  is supposed to show values instead of vacant.

   In exported excel report, this column shows values normally.


Reason:

    Unfortunately, I have no idea.

Solution:

    After adding one more column "Acutual Revenue (Opportunity)", the column "Acutual Revenue(Base) (Opportunity)" shows normally.


Free!!! Microsoft Dynamics 365 Fundamentals (CRM) certification

 Microsoft


Microsoft Dynamics 365 Virtual Training Day:
Fundamentals (CRM)

Microsoft Dynamics 365 Virtual Training Day: Fundamentals (CRM)


Learn about the customer relationship management (CRM) capabilities of Dynamics 365 at Microsoft Dynamics 365 Virtual Training Day: Fundamentals (CRM). Join us for this free virtual training event to learn more about the essentials of CRM sales, service, and marketing. You’ll explore how these facets work together to connect customer data, streamline business processes, and help you better manage your client relationships.

After completing this training, you’ll be eligible to take the Microsoft Dynamics 365 Fundamentals (CRM) certification exam at no cost.

You will have the opportunity to:

Join us at an upcoming virtual event:


Delivery Language: English
Closed Captioning Language(s): English


Didn’t see a date that works for you? Explore more upcoming events.


Unsubscribe / Se désabonner | Privacy Statement / Déclaration de confidentialité


Microsoft Canada
Suite 4400
81 Bay Street
Toronto, ON M5J 0E7 Canada


Microsoft


Dynamics 365 CRM Show/Retrieve Data of Grandparent Record

Requirement:

    We have a construct like entity1 - 1:n - entity2 - 1:n - entity3, and want to display data from entity1 in entity3 (form or list). 

Example:

     Opportunity 1:n Account

     Account 1:n Contact (Primarry Contact)

     Opportunity  no relationship with Contact (Primary Contact)

     So using Dynamics 365 CRM Advanced Find cannot retrieve fields of Contact to Opportunity list.

Solution:

      XrmtoolBox + FetchXML

  1. XML:     Download

      <fetch version="1.0" output-format="xml-platform" mapping="logical" distinct="false">

  <entity name="opportunity">

    <attribute name="name" />

    <attribute name="parentaccountid" />

    <filter type="or">

      <condition attribute="statecode" operator="eq" value="1" />

      <condition attribute="statecode" operator="eq" value="2" />

    </filter>

    <filter type="and">

      <filter>

        <condition attribute="actualclosedate" operator="last-x-months" value="8" />

      </filter>

    </filter>

    <order attribute="name" descending="false" />

    <link-entity name="account" from="accountid" to="customerid">

      <attribute name="primarycontactid" />

      <link-entity name="contact" from="contactid" to="primarycontactid">

        <attribute name="emailaddress1" />

      </link-entity>

    </link-entity>

  </entity>

</fetch>


     Result:


2. XrmToolBox:

  • FetchXML Builder:   Create XML


  • Export To Excel:   Export retrieve report to excel spreadsheet, work with FetchXML Builder


Switch Form Type Conditionally Using JavaScript(JS) in Dynamics 365

 In Dynamics 365, sometimes it could be a little overwhelming for some users to switch to the correct form when there are many types of forms for a specific entity(table).

For example, if the form type could be switched automatically when CUSTOMER filed value is changed, below JS could be your reference.

Applied Version:

  • Microsoft Dynamics 365 (on-premises) v9.0 or later
  • Microsoft Dynamics 365 Online

Trigger scenerio:

1. Form - Load

2. Filed: CUSTOMER - Changed

Sample Code:

function SwitchFormByCustomerLevel(executionContext)
{
    var form = executionContext.getFormContext();
    var formOpType = form.ui.getFormType();
   
    // variable to store the name of the form
    var FormShowType;

    debugger;
   
    // get the customer level picklist field
    var customerLevel = form.getAttribute("field_Customer_Level").getText();
    if(customerLevel == null )
    {
            return;
    }


    // switch statement to assign the form to the picklist value
    //change the switch statement based on the customer level picklist values
    switch (customerLevel)
    {        
        case "Gold":
            FormShowType = "Form - Gold";
            break;

        case "Silver":
            FormShowType = "Form - Silver";
            break;
           
        case "VIP":
            FormShowType = "Form - VIP";
            break;
                   
        default:
            //Assume Form Name is same with Product Type Name
            FormShowType = customerLevel;
    }

    // Current form's label
    var CurrentFormLabel = form.ui.formSelector.getCurrentItem().getLabel();

    //check if the current form is the form supposed to be displayed
    if (CurrentFormLabel != FormShowType)
    {
        var items = form.ui.formSelector.items.get();

        if (items == null)
        {
            console.log("Could Not Find Form List");
            return;
        }

        for (var i in items)
        {
            var item = items[i];
            var itemId = item.getId();
            var itemLabel = item.getLabel()

            if (itemLabel == FormShowType)
            {                    
                //navigate to the form
                item.navigate();
                break;
            } //endif
        } //end for    
    } //endif      
} //end function

Date/Time Columns(Fields) Error when Import Data File into Dynamics 365 from EXCEL(CSV)

When I tried to import an Invoice data into Dynamics 365,  I got a failure " The date/time format is not valid, or the value is outside the supported range."


So I compared the date/time column of the import spreadsheet with the date/time type field on Dynamics 365 and found they are in different format.

One is "DD/MM/YY" in Canadian format, and the other is "MM/DD/YY" in US format.


So I changed the date format of the import spreadsheet from US format to Canada format to be consistent with Dynamics 365 system. 

Try to import again, succeeded finally.


Duplicate Lookup Reference Failure When Import Data File in Dynamics 365

 Sometimes, when we tried to import excel data into Dynamics 365, we may get errors like "A duplicate lookup reference was found.".

For example, I tried to import the invoice list into Dynamics 365 CRM but got two duplicate errors for the Order and Opportunity fields(columns). 


    So, I search the order name on Dynamics 365 CRM,  yes, there are several order records that have the same name as the imported data. 
    Since these orders with the same name have been in Completed status, I can not easily change their name anymore. 


   But thank god, we have a column for Order ID in the spreadsheet. This order ID is unique.
So I determined to import "Order ID" and ignore "Order", and "Opportunity".

Then, map Order ID with Order field (lookup type) on Invoice form of CRM by using Order ID to search Order record.


Finally, I created a workflow to populate the Opportunity field based on Order field when new Invoice record created or Order field changed since there is 1:N relationship between Opportunity and Order Entities.


Customize Lookup Field Search Columns in Dynamics 365

For lookup fields in Dynamics 365 forms, sometimes we hope to search the record by some other columns other than its name column, so we may need to customize Quick Find View.

For example, 

In the Invoice form, there is a lookup field for Order.

Normally, we input order name to search the specific order reccord.


But if we wanna use order ID to search. we can customize below Quick Find All Orders View by adding another find column (ie. Order ID).


Finally, we may change the view of the lookup field (order) from "Order Lookup View" to "All Orders".

Then we can search order through order ID.